

How To Map Your Face To Skin A 3d Model

This is the procedure of my latest projection entitled, 'Making a Digital Face' in which the goal was to create a photorealistic 3D bust of a female hero character. To go photorealistic results you have to rely on photographs/references:
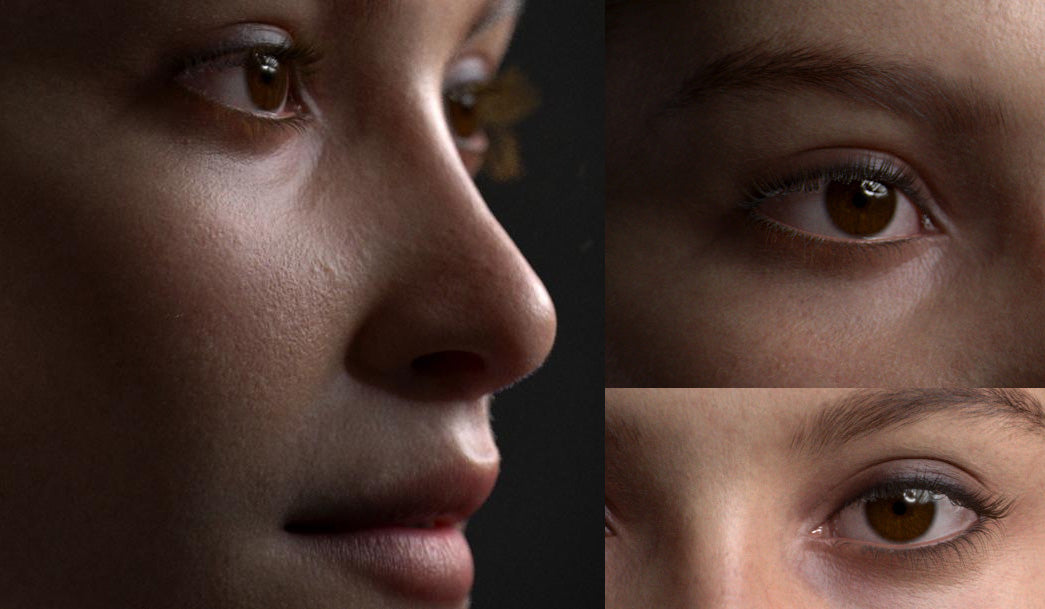
I decided on the extra, Gemma Arterton as my main reference point also as pictures of other female celebrities, portraits, and hairstyles to guide me along the process.

i. MODELING
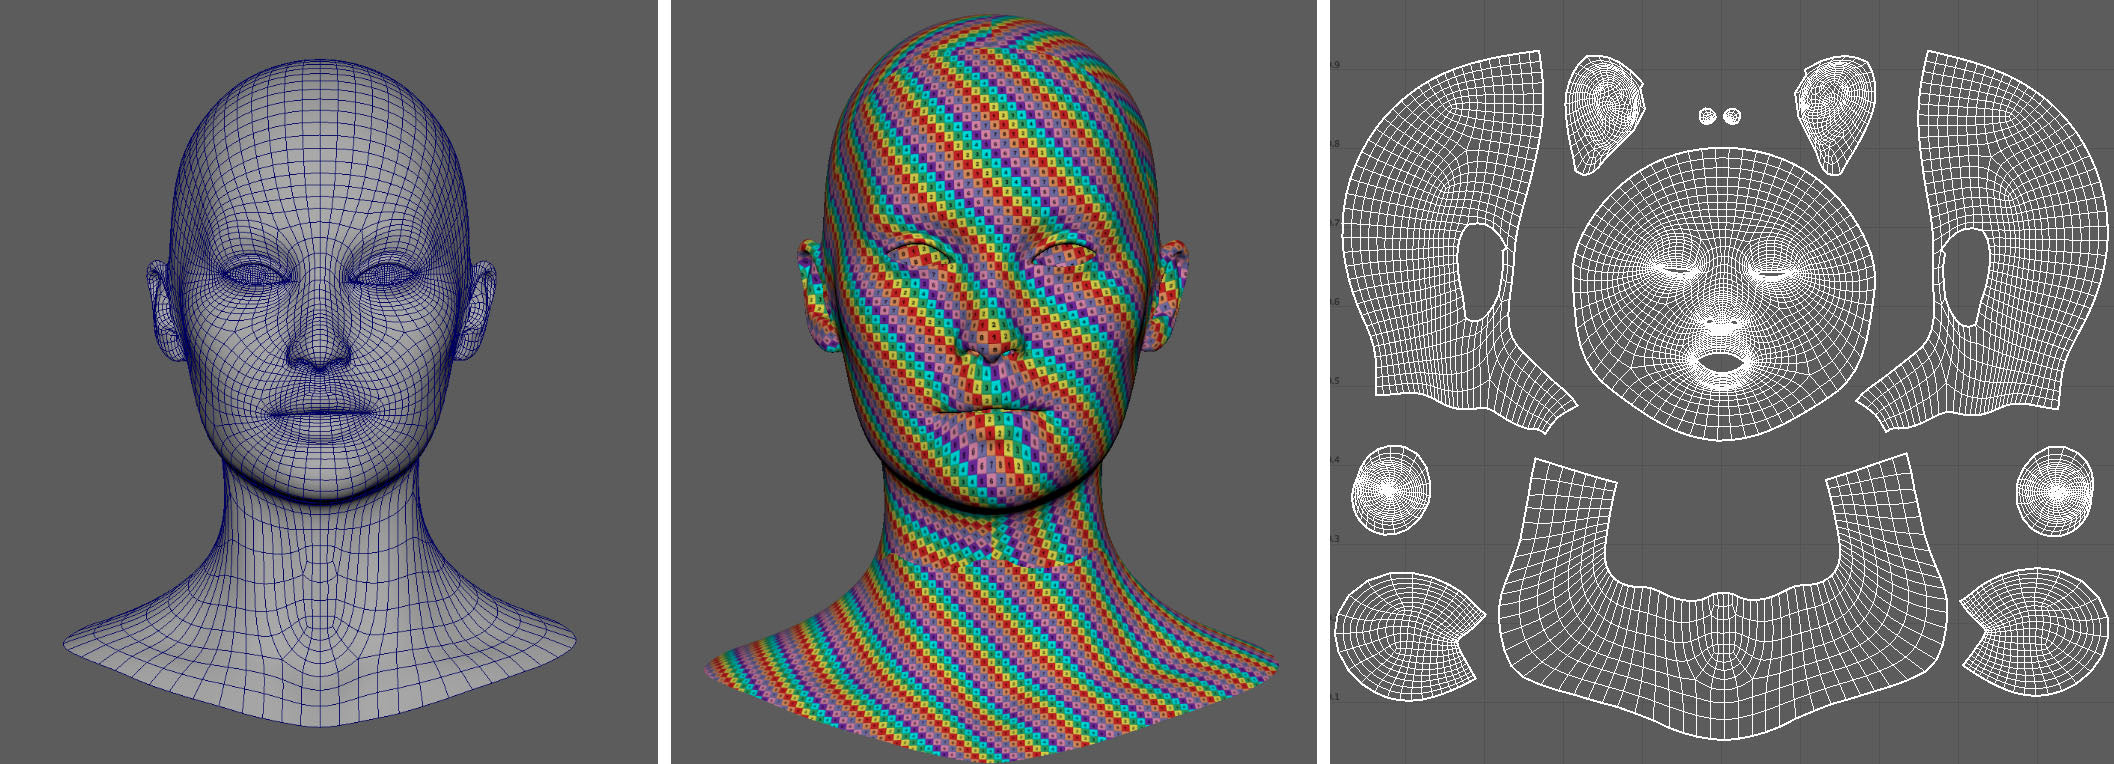
The base of operations mesh was modeled in Maya, I made sure to include topology for sculpting with clear edge-loops around the main features of the face. This base was then imported into ZBrush for sculpting. A solid understanding of facial anatomy is essential when sculpting a realistic face. I have been building my understanding of the forms of the face prior to this project through diverse digital painted studies. The head was sculpted in ZBrush by building up the planes of the face using the John Asaro's heads equally a reference. These sculptures break downward the head into elementary planes, which I find is a slap-up mode to create the initial blocking-out of the caput. Once I was content with the sculpt, the model was taken dorsum into Maya to be UV-mapped. I cut the model into a few shells (head, ears, neck and eyes and mouth cavity) and unfolded these UV projections to produce clean, undistorted UV components.
2. TEXTURING
The texturing process is an of import stage in the workflow of creating photorealism since low-quality/badly-painted textures can result in the 'uncanny valley'. Hence, the most effective textures to employ when creating photorealism is from photographs.
DISPLACEMENT MAP
Texturing XYZ's '20s Female' scanned data pack was used to project onto the mesh in Mudbox.
First, I would convert each map to RGB and organize these scans in Photoshop; pasting the secondary, tertiary and micro detail maps into the ruby, green and blue channels respectively. This results in the map shown below.

This map was exported at 8K resolution and projected in Mudbox (using the projection brush) onto the correct areas of the face up.
This projection layer was so exported from Mudbox at 4K resolution and brought dorsum into Photoshop. Its RGB channels were split and exported leaving me with 3 detail maps in one case again.

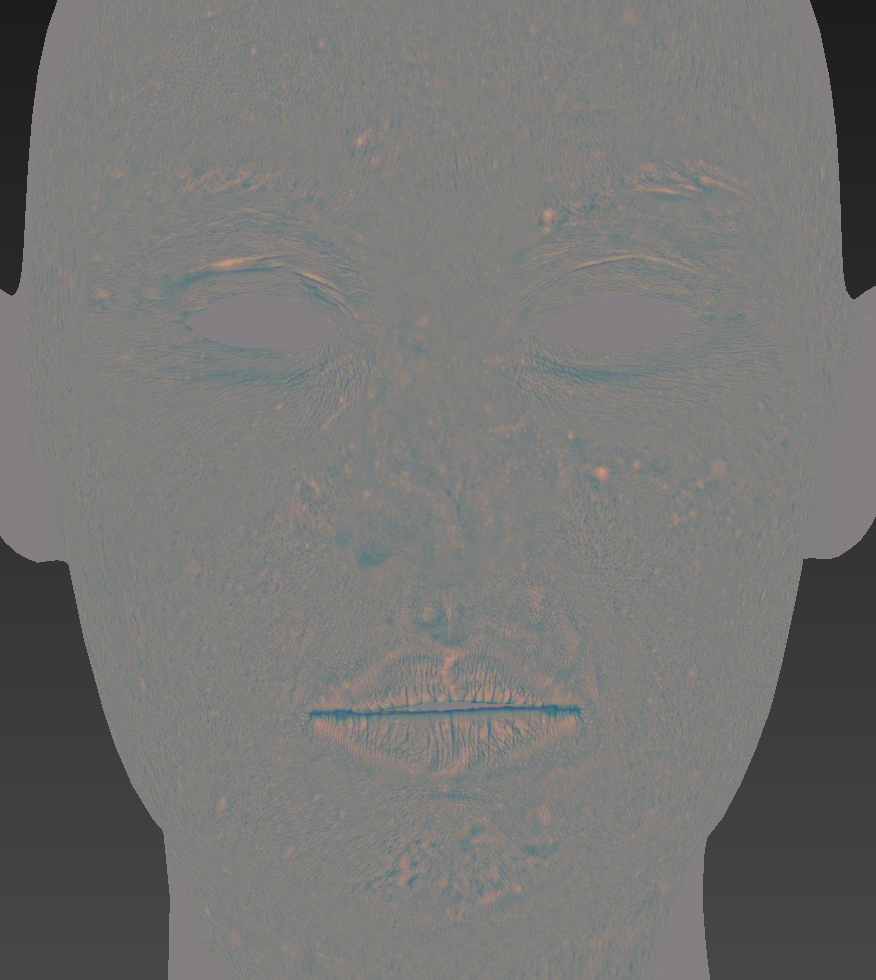
Back in ZBrush, all iii maps were imported and applied to the mesh as displacement, each on a dissever layer. These layers were so tweaked to produce an overall displacement on the face; information technology'due south important to slightly exaggerate the deportation detail in ZBrush, every bit some of this data gets lost when transferring to Maya afterward. I then manually sculpted extra wrinkles/pores where I saw fit and enhanced the detail on the lips, cheeks and the undereye area.

I then exported the map at 4K resolution using the settings shown below. The base of operations mesh was exported along with it.


DIFFUSE MAP
Generating the diffuse map was an identical process to the displacement map. In this case, I used Texturing XYZ's 'Female Face 20s #35' crossed-polarized photo set up to project onto the mesh in Mudbox. I fabricated sure to use every bit many angles as possible when projecting to ensure the projection was clean and free of shadows.
The diffuse layer was then exported directly from Mudbox to Mari to utilise some of Mari's procedural layers to the skin. Creative person, Beat Reichenbach gives a keen explanation online near how to enhance the skin using procedural layers by adding veins, freckles, dissonance and color variation to the skin.

The color zones layer was inspired past a blog on the colour zones of the face by Gurney Journey: this blog discusses the three coloured undertones of the face. These zones comprise of a yellowish tint on the brow; redness for the nose and cheeks, and a blueish/green tinge for the mouth and mentum. Since these colour zones are subtler in women than men, the layer was reduced to a low opacity but gave the skin a unlike experience.

CREATING ADDITIONAL MAPS
Additional maps created for the skin involved layering crenel and ambient occlusion maps (exported from ZBrush) and manual paint-overs in Mari.
The specular map (left) is particularly important because, unlike the displacement and diffuse maps, its visibility does not subside from a distance, maintaining realism at all times. The shinier areas of the face up were made whiter on the texture map, for instance, the forehead, nose, eyebags, lips, mentum and cheeks were highlighted. Some features were fabricated lighter than others since these areas are more specular (nose is shinier than the chin). It's important that the specular map provides an overall shininess to the face. The gloss map (right) is more than specific every bit it represents the oiliness of the face. So, the nose, eyebags and forehead were accentuated hither, with the addition of the bottom lip.

A further map was created which allowed me to control how much subsurface scattering occurs on the face when it reacts to light. Subsurface scattering is, in my opinion, a defining factor for photorealism but it can easily exist overdone causing the skin to await waxy. Areas of the face up that consist of bone scatters less calorie-free so are painted darker, whereas areas of the skin roofing cartilage (septum, ears, etc.) are painted lighter.
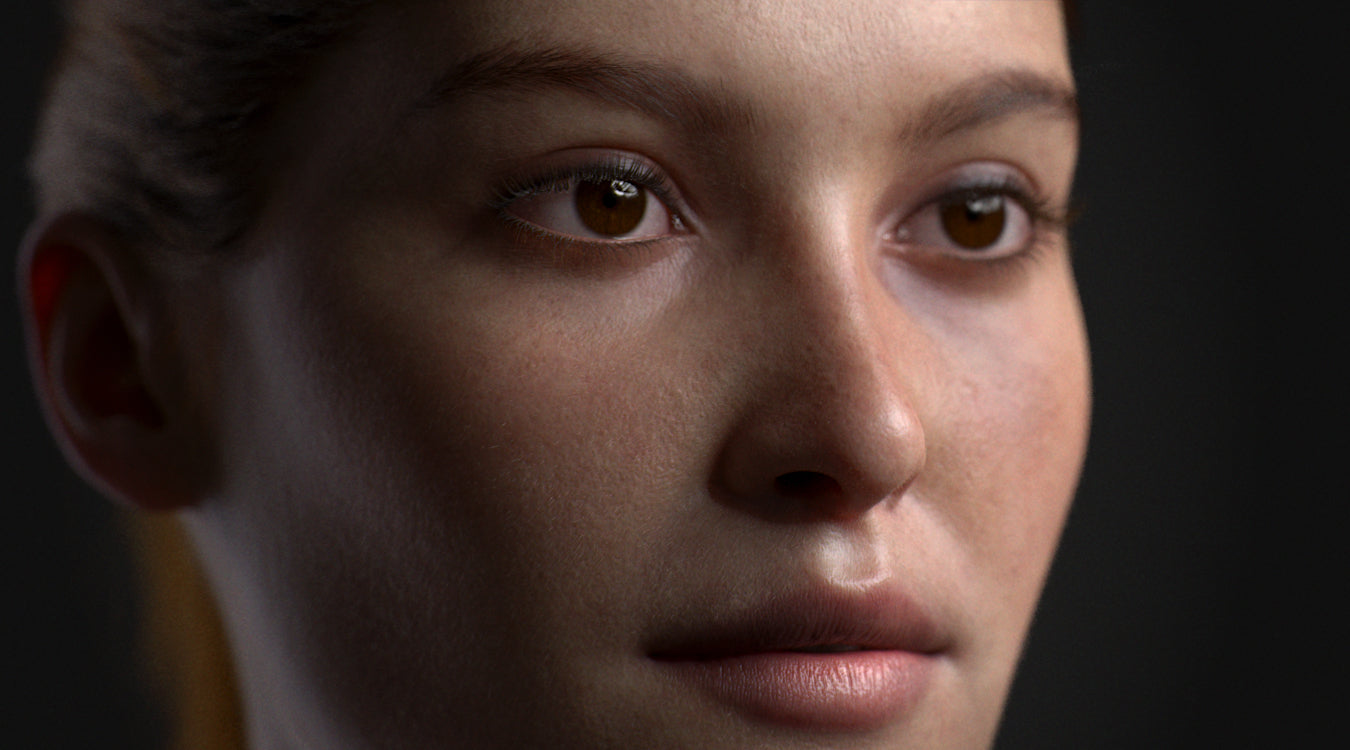
3. LOOKDEV
Once all the maps were created, the model was imported into Maya and applied a 'mesh polish'. The subdivision type was set up to 'catclark' and its iterations set to 2 (for at present). Arvid Schneider provides in-depth shading tutorials online which have helped me to bring the graphic symbol to life in Arnold.
After the grapheme was assigned an 'aiStandardSurface' material, the diffuse map was plugged into the 'subsurface colour'; the specular map and gloss map were plugged into the specular weight and glaze weight, respectively. From here the roughness and IOR values were adjusted to give the desired upshot (the IOR value for the skin comes every bit a preset in Arnold'due south standard shader material, which is ane.iv).


I stayed as faithful as I could to homo skin by comparing to my reference images throughout. It'south easy to fall into the trap of producing something yous recollect looks real merely to become photorealistic results y'all have to study photographic reference. The terminal skin shader was constantly fine-tuned correct to the very terminate; the process was completely iterative, I went between Photoshop, Mudbox, Mari and Maya to tweak the maps until I got the results I wanted.

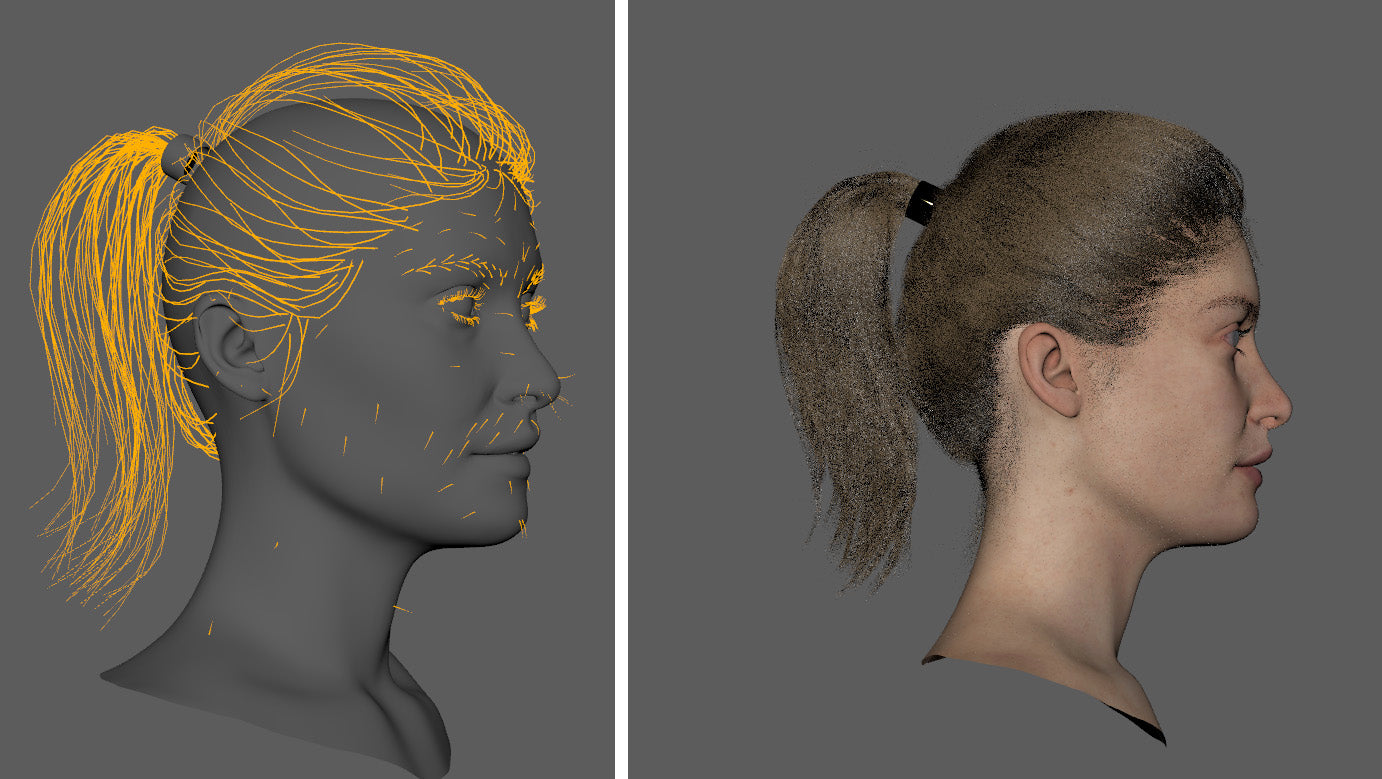
4. XGEN
EYEBROWS & EYELASHES
The beginning role of the XGen process was to create the eyebrows and eyelashes. I used the 'place and shape guides' characteristic within XGen. These guides are a geometry that can be moved and deformed easily. When activated, the XGen hairs are then interpolated according to the guides. Modifiers tin can then exist added to insert noise into the pilus; clump the hairs or cut the hairs then they take an uneven appearance. The guides for the eyebrows (shown beneath) demonstrate the direction that the eyebrows follow. Equally for the eyelashes, the upper eyelashes are denser than the lower lashes; a stiff noise modifier was added to the lashes, and so they could overlap and feel natural.

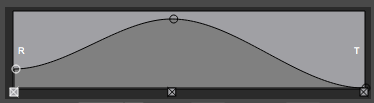
Hair naturally tapers, then information technology's important to capture this using the width ramp; a lack of tapering is a big part of why hair tin feel uncanny in 3D portraits. The width of most every groom created in this portrait used a width ramp like to the one beneath.


Density maps were painted for every clarification and so I could command exactly where I wanted the hairs to extrude from (blackness removes hair and white gives you the maximum density). Before creating the description, I would duplicate the head geometry and extract a section for the groom. For example, with the eyebrow groom, I extracted the eyebrow region of the mesh and discarded the rest. I and then unfolded its UVs to increase its resolution. Painting density maps rely on UVs, so doing this ensures that you can paint on the mesh cleanly and easily.


MAIN HAIR
The pilus was congenital using a layering of descriptions, from the base to the fine strands of the hairline. I had to study many images to capture the correct hair period. Creating the main head of hair was definitely the nearly challenging attribute of this portrait, the main reason was that with the ponytail hairstyle, the hair is pulled back exposing the hairline. Accurately capturing the natural progression of the hair growing from the scalp is a tough feat and can make the portrait look uncanny. I made sure to create private descriptions for the hairline, and so I could accept control over its appearance.
Similar with the eyebrows/eyelashes, the hair tapers at the start and at the end, this helps in creating that natural pilus growth, and as before, clump and noise modifiers were used to break its uniformity.

A technique I used to blend the eyebrows and the hairline better was to create an interactive groom. I made the width and length very low and posed the hairs and so that they flowed in correct direction along the forehead. I would increase the width of the splines as they would approach the hair/eyebrow groom, which created this graduation that is seen in existent hair.

One time the hair, eyebrows and eyelashes were all groomed, I placed guides over the face for the peach fuzz. Peach fuzz hairs should be very thin and generally unnoticeable; only when a bright light shines on the face or stark shadows are cast should the peach fuzz get visible.


With minimal XGen/groom experience prior to this projection, I learned a lot from this process and hope to practise a better task of creating realistic hair for my adjacent project.
5. RENDERING
The scene was lit using a iii-betoken light setup (plus a subtle sky dome lite). I wanted some shadow to be cast in the portrait because it highlights the contours of the face and makes the portrait appear less apartment. One time the setup was established, the skin and hair shaders were adjusted and finalized.

For the last renders, a college subdivision of the model was used with its subdivision type gear up to 'catclark' and iteration value set up to four. This allows the model to displace more item, though information technology volition increase return time. My return settings were as follows; these values were tried and tested and eventually settled upon.

I am fascinated by the great challenge of creating conceivable digital humans and crossing the dreaded 'uncanny valley'. I intend to study further and share more than digital humans with you in the future!
I promise you enjoyed the process of 'Making a Digital Face'. Feel free to follow my work : https://www.artstation.com/sefki_i

We would like to thank Sefki for his helpful contribution.
If you're likewise interested to exist featured here on a topic that might interest the community, feel free to contact u.s.a.!

Source: https://texturing.xyz/pages/making-a-digital-face-sefki-ibrahim
Posted by: devittpatern.blogspot.com
0 Response to "How To Map Your Face To Skin A 3d Model"
Post a Comment